As Sage Intacct and Lightyear are both cloud-based, setting up and connecting the systems is seamless. Let us take a detailed look at the various aspects regarding the Sage Intact Sync:
Prerequisites
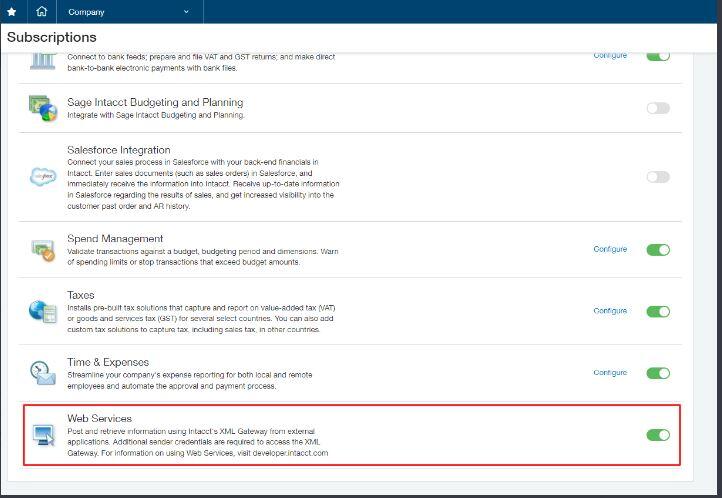
Subscribe to Web Services
One will need to add the Company’s Sender ID over to the Sage Intacct Allowed List.
Within Sage Intacct, go to Applications > Company > Subscriptions.
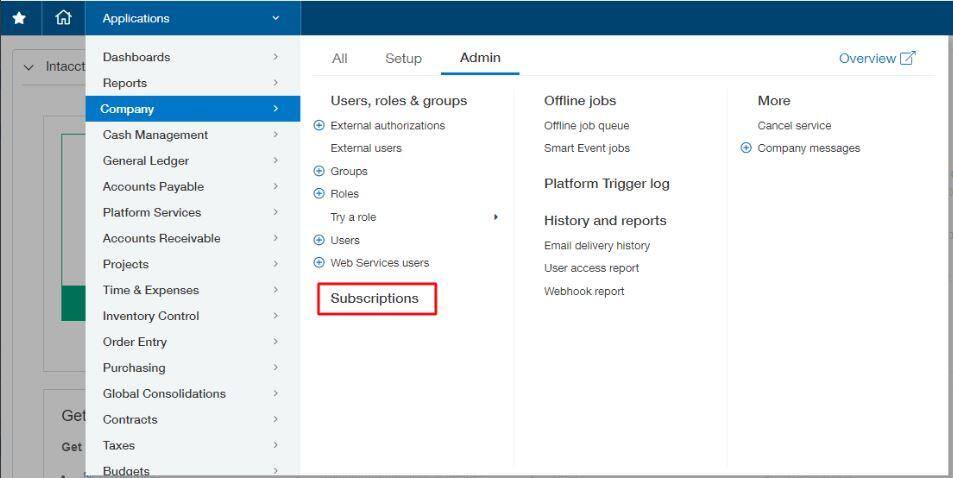
- Navigate down until you locate the Web Services
- Now click to Subscribe.
- One will find a warning about additional charges, this can be ignored.
Adding the Company IP Address
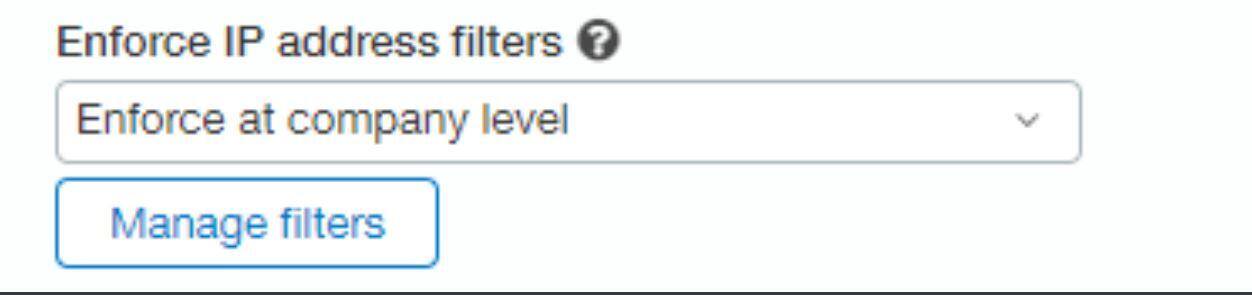
The IP Address needs to be added within Sage Intacct to allow you to launch API Requests.
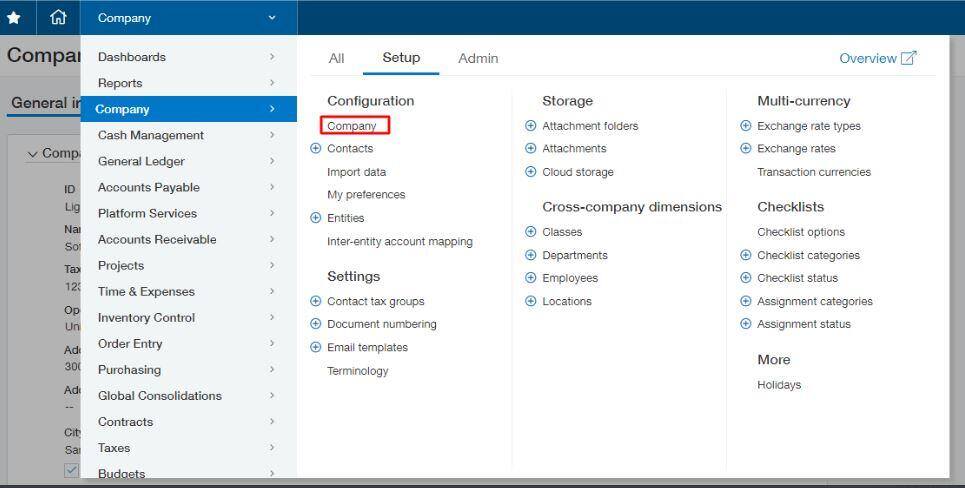
Navigate to Applications > Company > Company
- Go to the Security tab
- Now locate the field Enforce IP Address Filters
- Next, click select Enforce at the Company Level
- Finally, click Manage filters
 In the popup modal, enter the following details:
User: Select yourself (or the user making the connection to Lightyear)
Start IP Address: 52.24.2.56
End IP Address: 52.24.2.56
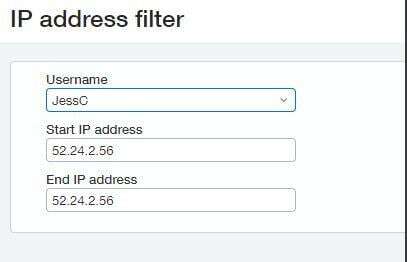
After it has been entered, click Save.
Adding Lightyears’ Company Sender ID
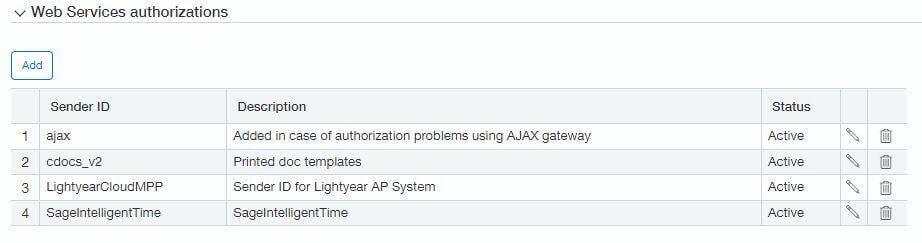
Once within the Security tab, navigate to the Web Services Authorizations and click the Add button.
You are needed to create 2 steps for this setup.
First, create one with the following details:
Sender ID: ajax
Description: Added in case of authorization problems using the AJAX gateway
Second, create another with the following details:
Sender ID: LightyearCloudMPP
Description: Sender ID for Lightyear AP System
Creating a User with Role-Based Security
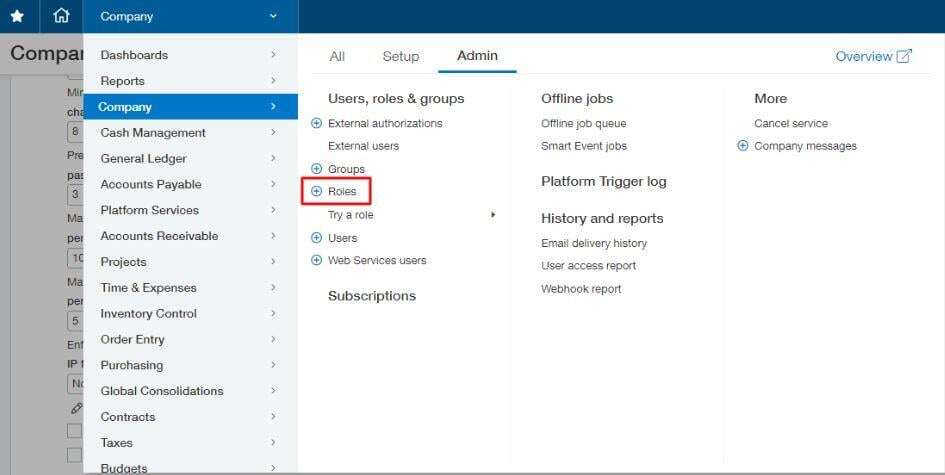
Head over to Applications > Company > Roles
Click the Add button in the top right corner.
Give the user a name, something with Lightyear included, so it is easy to locate.
Within Subscriptions, give the user the access to the correct Modules – It is suggested:
- Administration – All
- Company – Read Only
- General Ledger – All
- Accounts Payable – All
- Projects – All (Only enable this if you are using Projects within Sage Intacct)
Ensure to Save the changes before you exit.
After this has been finished, one can link this Role to a certain user.
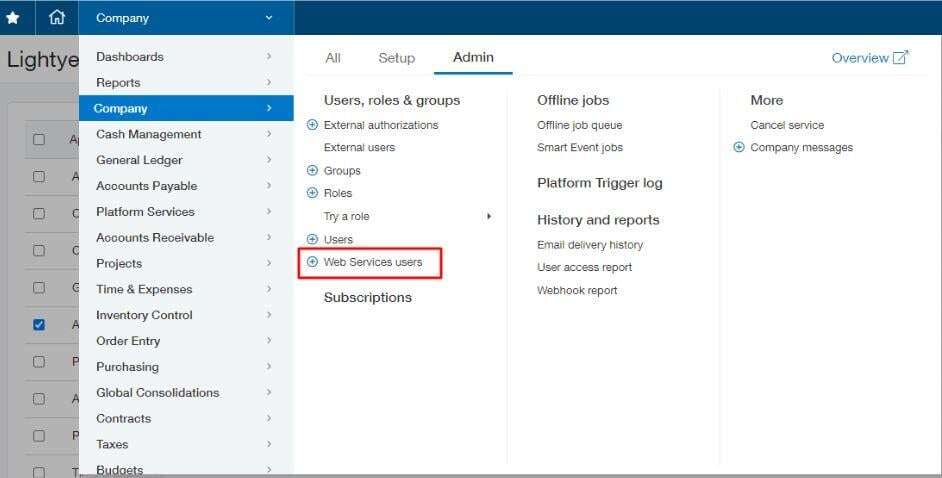
Within Applications > Company > Admin > Web Service Users click Add in the top right.
Enter the following information for the user:
- User ID
- Last Name
- First Name
- Email Address
- User Type = Business User
Within the Roles Information tab, assign the user the same Lightyear Role as previously created. Click Save. One might also see a warning message about an additional charge, and this can be ignored.
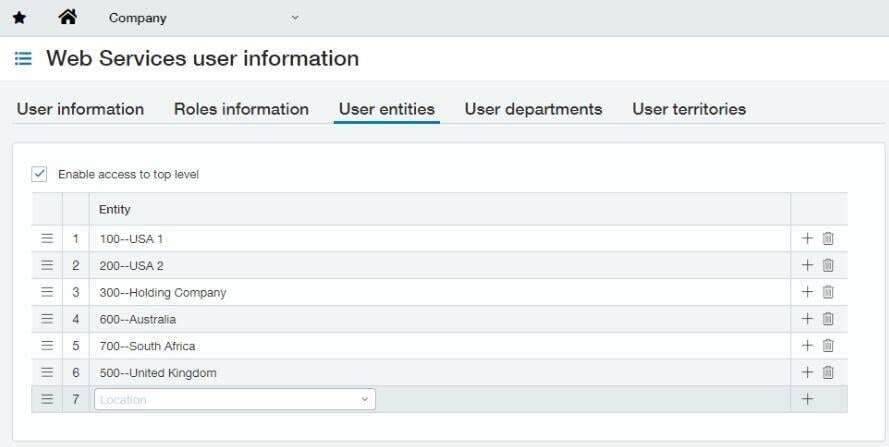
WithIn the User Entities tab, you need to assign the entities that Lightyear is to write to (enabling ‘Top Level’ if desired):
The password for this user profile will be emailed to the from Sage – this will be needed later when connecting to Lightyear.
Creating a User with User-Based Security
WithIn Applications > Company > Web Service Users click Add in the top right
Enter the following information for the user and Save:
- User ID
- Last Name
- First Name
- Email Address
- User Type = Business User
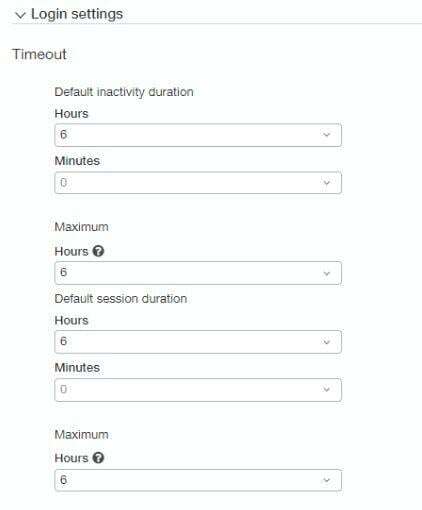
Inactivity Duration and Session Duration
Within Sage Intacct, you need to make sure that your Inactivity Duration and Session Duration are set as the below defaults:
To find this page:
go to Company > Setup > Company > Security.
NOTE: In case one has these set as different durations, one might experience import/export issues.
Establishing the Connection
Within Lightyear, go to the Navigation Pane, next to Settings > Accountancy > select Sage Intacct > Connect
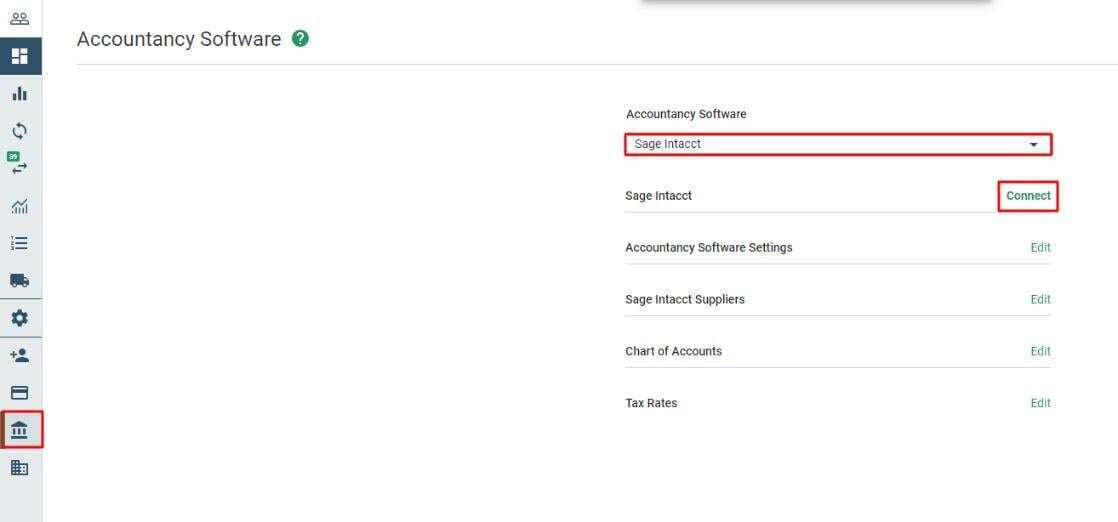
You will notice a pop-up modal asking for the user to select the setup you have within the Sage Intacct account. Likewise, you do not have to worry, this can be changed later as well. More details about what every option is can be found below!
After you have changed the settings to your liking, you need to click Confirm & Connect.
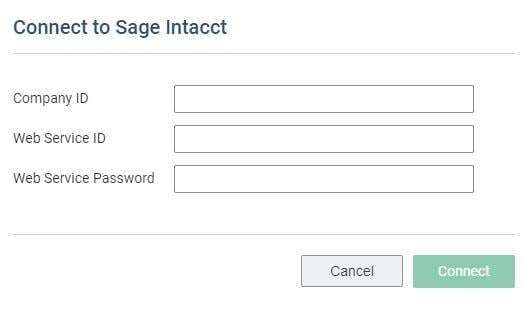
The user will be asked to enter the Company ID, Web Service ID, and Web Service Password. It is recommended to use a Web Service User to create the connection in Lightyear.
Related Topic-> Sage Intacct sync: Transactions Aren’t Syncing after Initial
Company ID: Can be found in Sage Intacct under Company > Company Information > General Information > ID
Web Service ID: This is the ID of the Web Service User profile
Web Service Password: The Web Service User profile password was emailed from Sage
- The final step is to select the Sage Intacct Entity from within the dropdown menu.
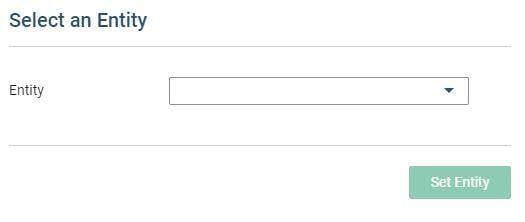
Every entity will automatically relate to a location, e.g. United Kingdom, Australia, the United States, etc. In case the user has multiple Lightyear accounts that have been set up for multiple locations, connect the account to the corresponding location – Lightyear UK to Sage Intacct UK.
Lightyear will automatically sync the following data back from Sage Intacct that is required to process the payables bills:
- Dimensions (Departments, Classes, Items, Locations, Projects, Customers)
- Sage Intacct Suppliers
- Chart of Accounts
- Tax Rates
The name of the Sage Intacct company will be displayed once the connection is established to inform you which account is connected. The connection will remain active even when you log out and back into both systems and any user with Export permissions within Lightyear will be able to export bills to Sage Intacct.
Syncing of your Lightyear and Sage Intacct account is now complete and you will be connected.
Please Note: This user will not be able to log into Sage Intacct. The main purpose of the user is to create the connection between Lightyear and Sage Intacct.
If you do nothing else in this section, please ensure you skip ahead to set your default tax rates before you move on. Trust us, it will make your life SO much easier moving forward.
Software Settings
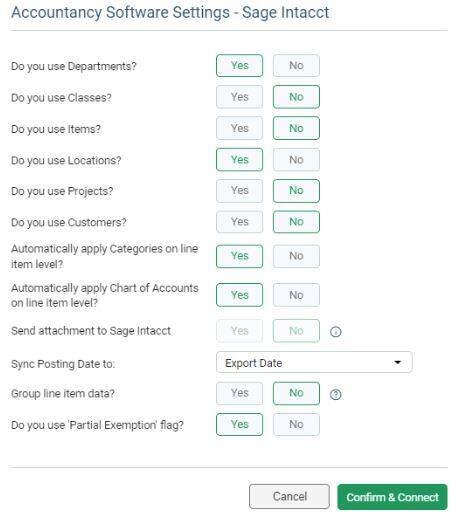
One can easily Customize the Sage Intacct settings by selecting Accountancy Software Settings. In this section, one can:
- Start by Turning on up to 2 Dimensions
- To Automatically apply Chart of Accounts on line item level
- To Turn on or off the ability to send attachments to Sage Intacct
- For the Attachment Folder
- For the Group line item data
Do you use Departments/Classes/Items/Locations/Projects/Customes?
In this case, you need to select up to 2 Dimensions to use within Lightyear. Turning any combination of these Dimensions to Yes will automatically sync the data across from Sage Intacct.
Automatically apply Chart of Accounts on a line item level?
- Yes – To Save time by coding it within Lightyear, and it will be remembered the next time you extract the line item that you have coded the supplier lines to.
- No – You need to Keep these blank for you to code individually.
Send attachment to Sage Intacct?
- Yes – this will send a copy of the document upon export, this can be identified as an attachment to the document in Sage Intacct.
- No – this will only send the bill data over to Sage Intacct, along with a URL of the document within Lightyear
In case you are required to send the attachment over to Sage Intacct, this will be added to the Attachment field within every Bill/Adjustment.

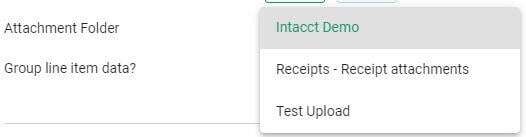
Attachment Folder
In case you select Yes on the Send Attachment to Sage Intacct option, the field for Attachment Folder will become available.
The Attachment Folder will differ according to what has been set up within the Sage Intacct account. Now you need to select the dropdown next to the field and select the location you wish for the attachments to be saved.
This attachment folder can be checked within Sage Intacct by navigating to Applications > Company > Setup > Attachment Folders or Attachments.
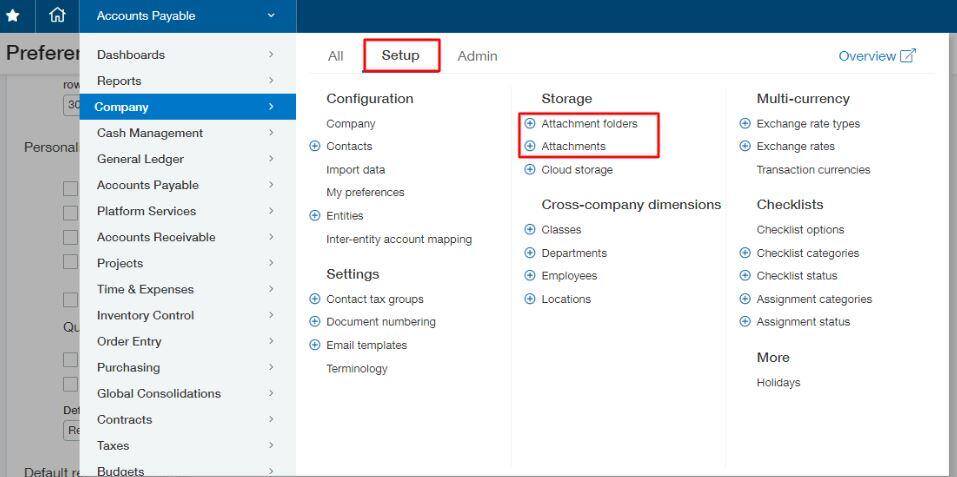
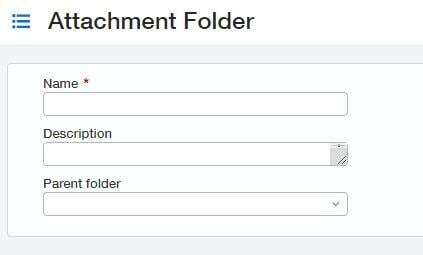
In case you do not have any Attachment Folders that have been created within Sage Intacct, click the + next to Attachment Folders to create a new one.
Now you need to Enter a Name for the folder, and add a Description and Parent Folder if needed :
NOTE: It is not possible to add an attachment to a Credit Note/Adjustment within Sage Intacct. In this case, the URL will be sent instead.
Attachment URL
In case the user selects No within the Send Attachment to Sage Intacct option, the user will send the URL of the document within Lightyear over to Sage Intacct. Before selecting this, one will need to create a Custom Field within Sage Intacct in order to enter this URL.
WithIn Sage Intacct, navigate to:
Applications > Platform Services > + Custom Fields and Add a new one. These steps are necessary to be followed two times, one time in the case of the Bills, and once again for the Adjustments.
Step 1: With In the Object dropdown menu, you need to select AP Bill or AP Adjustments
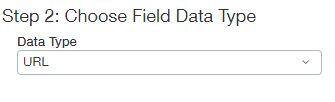
Step 2: Data Type is set over to URL in case of both the Bill and Adjustment.
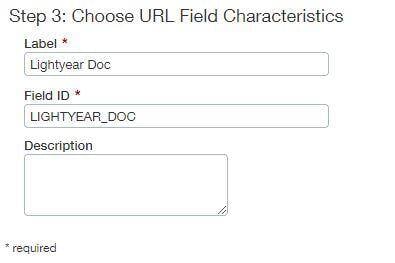
Step 3:
- Within the Label field, you need to enter Lightyear Doc. This is the field that will be displayed within the Bill/Adjustment.
- WithIn the Field ID field, you need to enter ‘LIGHTYEAR_DOC’ and leave the Description blank.
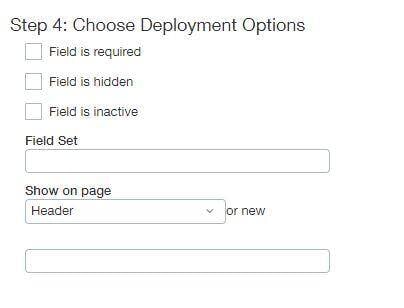
Step 4: Show on Page needs to be set to Header from the dropdown menu. Meanwhile, the other fields can be left blank.
According to which one has been created first, do not forget to repeat these steps for the other side, either Bill or Adjustment.
Group line item data?
Turning this feature on will allow the user to be able to export Grouped Account data, instead of the line item data.
Sage Intacct Suppliers
Sage Intacct Suppliers are what Lightyear utilizes to be able to connect a Supplier within Lightyear to a Supplier within Sage Intacct. Any existing Suppliers within Sage Intacct will be displayed here, once the connection has been done.
Once the user has connected to Sage Intacct, by default, the list of the existing Sage Intacct Suppliers is automatically synced to Lightyear.
Importing from Sage Intacct
In order to import the Sage Intacct Suppliers:
- Navigate to Accountancy
- Go to Sage Intacct Suppliers
- Now Import Suppliers
This import will comprise the following details, taken from the Sage Intacct account:
- Supplier Name
- VAT Number
- Country Code
- Currency
- Default Account Code
- CIS Registered
- Default Tax Code
In case the user wishes to eliminate a Supplier, you need to simply click the red trash can icon
![]() located on the right of each line.
located on the right of each line.
Create New Sage Intacct Suppliers
In case the user observes that they do not have a Supplier set up within the Sage Intacct account and Lightyear, one can easily create this within Lightyear.
To do this:
click the + Supplier option located within the top right of Sage Intacct Suppliers. The following modal will display:
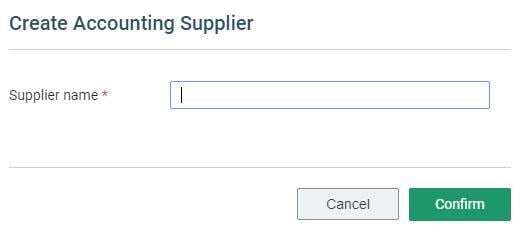
Within the Supplier Name field, you need to enter the name of the Supplier as one would like it to be displayed from within Lightyear and Sage Intacct. Once this has been entered, you need to click Confirm.

Chart of Accounts
Account Codes are all necessary to Lightyear once you link the Sage Intacct account. These are displayed within the Account Code section of Accountancy. The Account Codes can also be checked in one long list or by filtering by Type, located in the top left corner.

In case the user can make any updates to their Accounts within Sage Intacct, one can navigate to Accountancy > Chart of Accounts in Lightyear and click the Import from Sage Intacct button, this will update and refresh your list.
![]()
In case the user wants to minimize the number of Account Codes that Lightyear presents to you within the dropdown lists, you need to uncheck the tick boxes located on the right of each Account Code.
Lightyear requires a Rounding Account Code to be able to Export over to Sage Intacct. When calculations from Lightyear are different from the calculations from Sage Intacct, one will need to add in a Rounding Row to ensure that the calculations match and are correct. If you do not have one, then you need to add an Account Code within the Sage Intacct for Rounding and to make sure that there are no rules set against this e.g. no Dimensions/Tax Codes linked to it.
Accounts Receivable – Invoice Creation in Sage Intacct
Sage Intacct helps streamline the invoice creation, hence freeing the user from tedious tasks. This is how to take charge of the invoice creation:
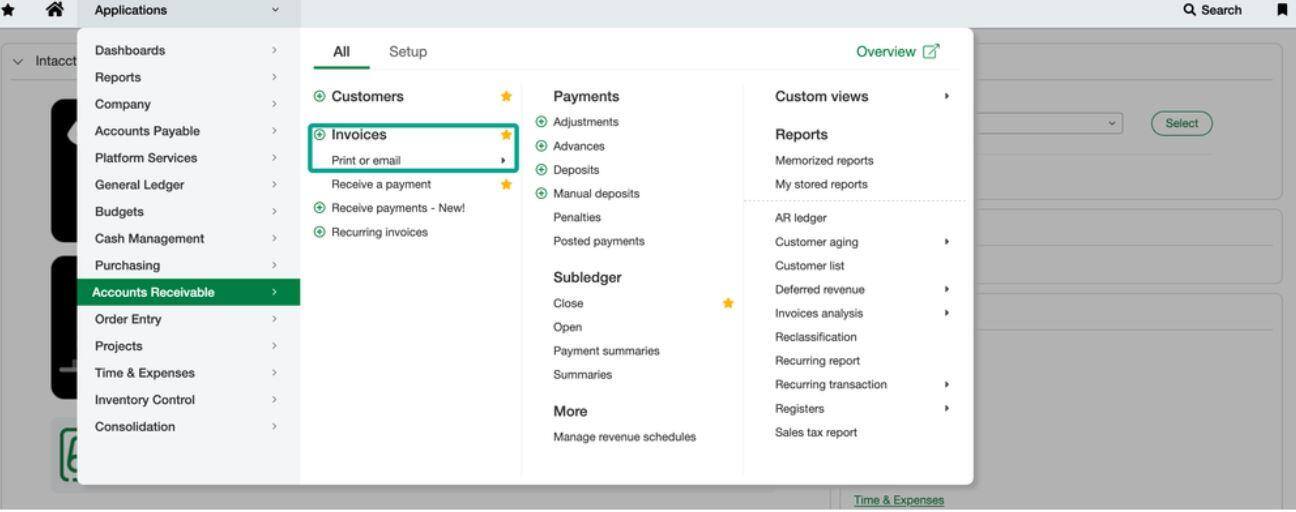
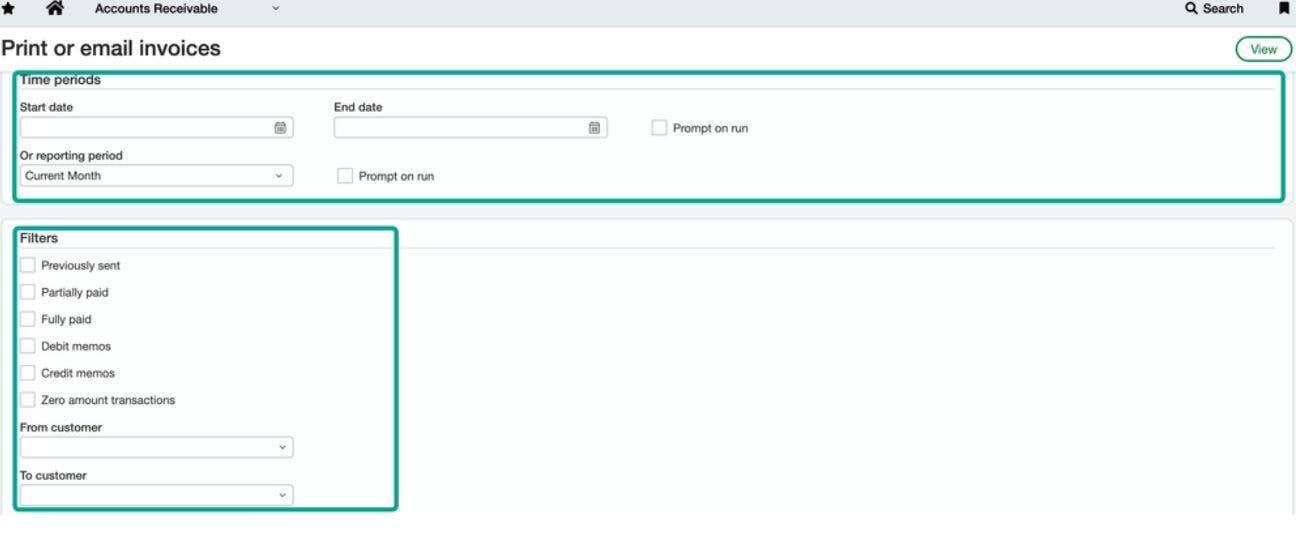
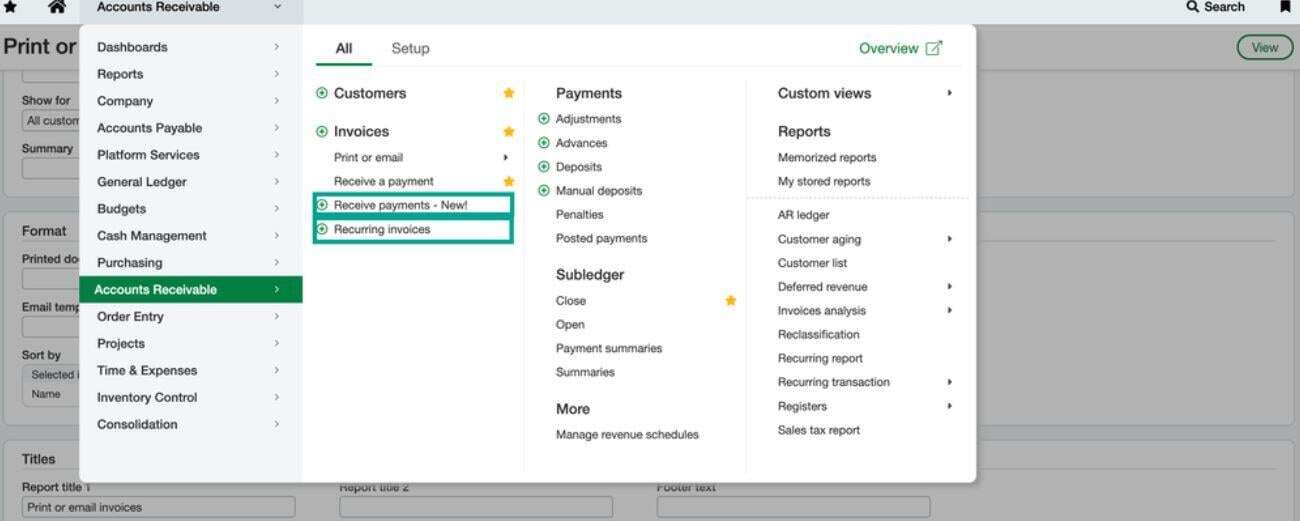
- Go to Invoices: Find the “Invoices” tab within Sage Intacct located in the ‘Accounts Receivable’ section. Here, you can create and manage all your invoices.
- Customer Selection: Go to the pre-populated list, here the user can efficiently select the billing customer.
- Invoice Details: Here you can enter all the relevant information about the invoice. One can also accommodate one-time sales, service-based projects, or even partial payments.
- Itemize Your Bill: Here you can Add line items for the relevant products or services. To specify the descriptions, quantities, unit prices, and any other applicable taxes.
- Invoice Templates: One can create and access invoice templates that allow the user to reflect the brand identity with logo, color scheme, and legal information.
Processing Invoices with Ease
Once invoices are sent, Sage Intacct simplifies the management process:
- Recurring Revenue: To help Define the billing cycle in the case of recurring invoices for regular clients and subscriptions, Sage Intacct will automatically generate and share those invoices at the designated intervals.
- Real-Time Payment Tracking: One can see those invoices that have been paid, those that are overdue, and their respective amounts.
- Automated Reminders: One can set up automated reminders in case of overdue invoices to late payment notifications.
- Payment Recording: Once a payment has been received, one can easily record it within Sage Intacct. Now you need to Match the payment over to the corresponding invoice, and the system will automatically update the financial records. This makes sure of accurate accounting and simplifies reconciliation.
- Reporting and Analysis: Sage Intacct also offers robust reporting tools. One can Generate reports to analyze the invoicing data, identify sales or overdue payment trends, and gain valuable insights into the overall business performance.
Accounts Payables: Invoice Processing
Invoice processing is an integral part of Accounts Payables, and Sage Intacct can manage this side of invoices and also create invoices.
Accounts payable, or AP is the amount of money a certain business owes to its vendors for goods or services that have been delivered but are yet to be paid. The AP department is responsible for keeping a closed record of invoices, making sure that the payments have been processed accurately and on time, hence maintaining detailed financial records.

Sage Intacct helps enhance the Accounts Payable team along with insights. It also assists the bills, reconciliation, and other relevant tasks.
- Approve Bills: Within the Accounts Payable portion, you need to click on Pay Bills to approve and pay invoices.
- Record & Approve Payments: One can record any payment that has been made and approve to pay through any of the integrated credit card or other payment methods
The manual AP process needs to be more active, vulnerable to human error, and labor-intensive. Account Payable Automation, or APA, hence grows all the more important to digitizing, streamlining, and optimizing.
Sage Intacct offers two basic methods to automate the accounts payable (AP) process:
- Sage Intacct AI: Sage comprises a built-in AP automation feature along with AI capabilities. Here’s what it can assist the user with:
- To Upload an invoice, Sage can capture the data from the invoice
- It also helps flag any duplicate invoices
- Third-party AP Automation Integrations: Sage Intacct popularizes a wide range of integration and technology partners, some also within their Marketplace. They also offer solutions along with a wider range of features, such as:
- Accurate capturing of Invoice data f
